dsh-root-bridge
xiaohuangbo/dsh-root-bridge
Session-level root privilege bridge for DeepSeek Harness: ask mode with per-request web approval, full root mode (polkit password entry in the web UI) and fakeroot mode, with sudo or run0 --empower escalation and a configurable subagent sudo policy. It escalates real commands with sudo or run0: in ask mode each request waits for your approval; in full root mode every bash command of the session runs elevated after one password entry in the web UI. Delegated subagents need per-request approval by default (subagentPolicy: request).
Install
dsh plugin --profile web add github:xiaohuangbo/dsh-root-bridgeREADME

dsh-root-bridge · root 权限桥
A session-level root privilege bridge for DeepSeek Harness — request approval, full root, and fakeroot modes with sudo / run0 escalation, all driven from the web GUI.
DeepSeek Harness 的会话级 root 权限桥:申请制 / 完全 root / Fakeroot 三种模式,sudo / run0 两种提权方式,审批与密码认证全在网页 GUI 内完成。



Author / 作者:xiaohuangbo Repo / 仓库:https://github.com/xiaohuangbo/dsh-root-bridge
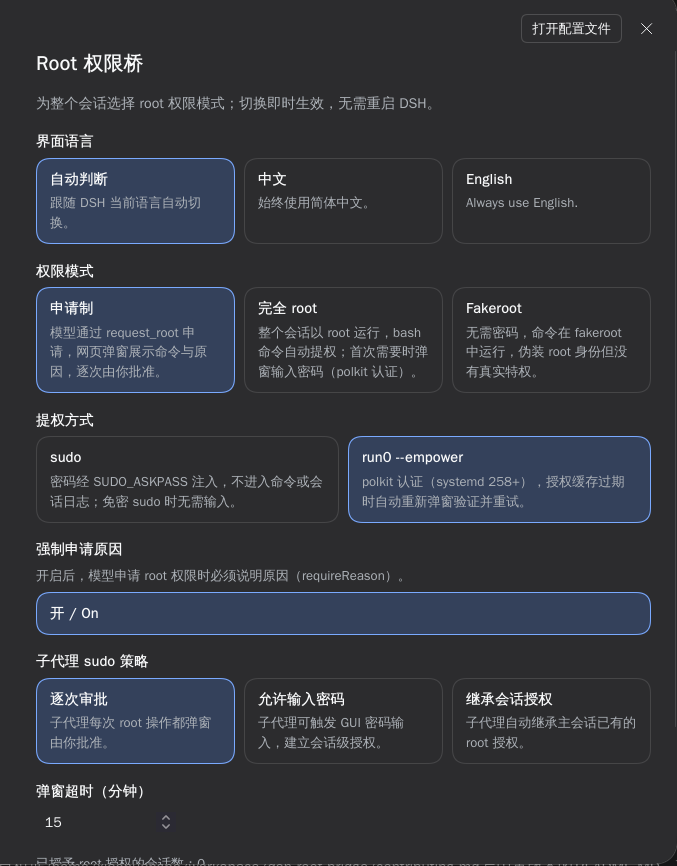
The settings page (Settings → Root bridge) with mode, escalation, subagent policy and language. / 设置面板里的「Root 权限」页:模式、提权方式、子代理策略与界面语言。

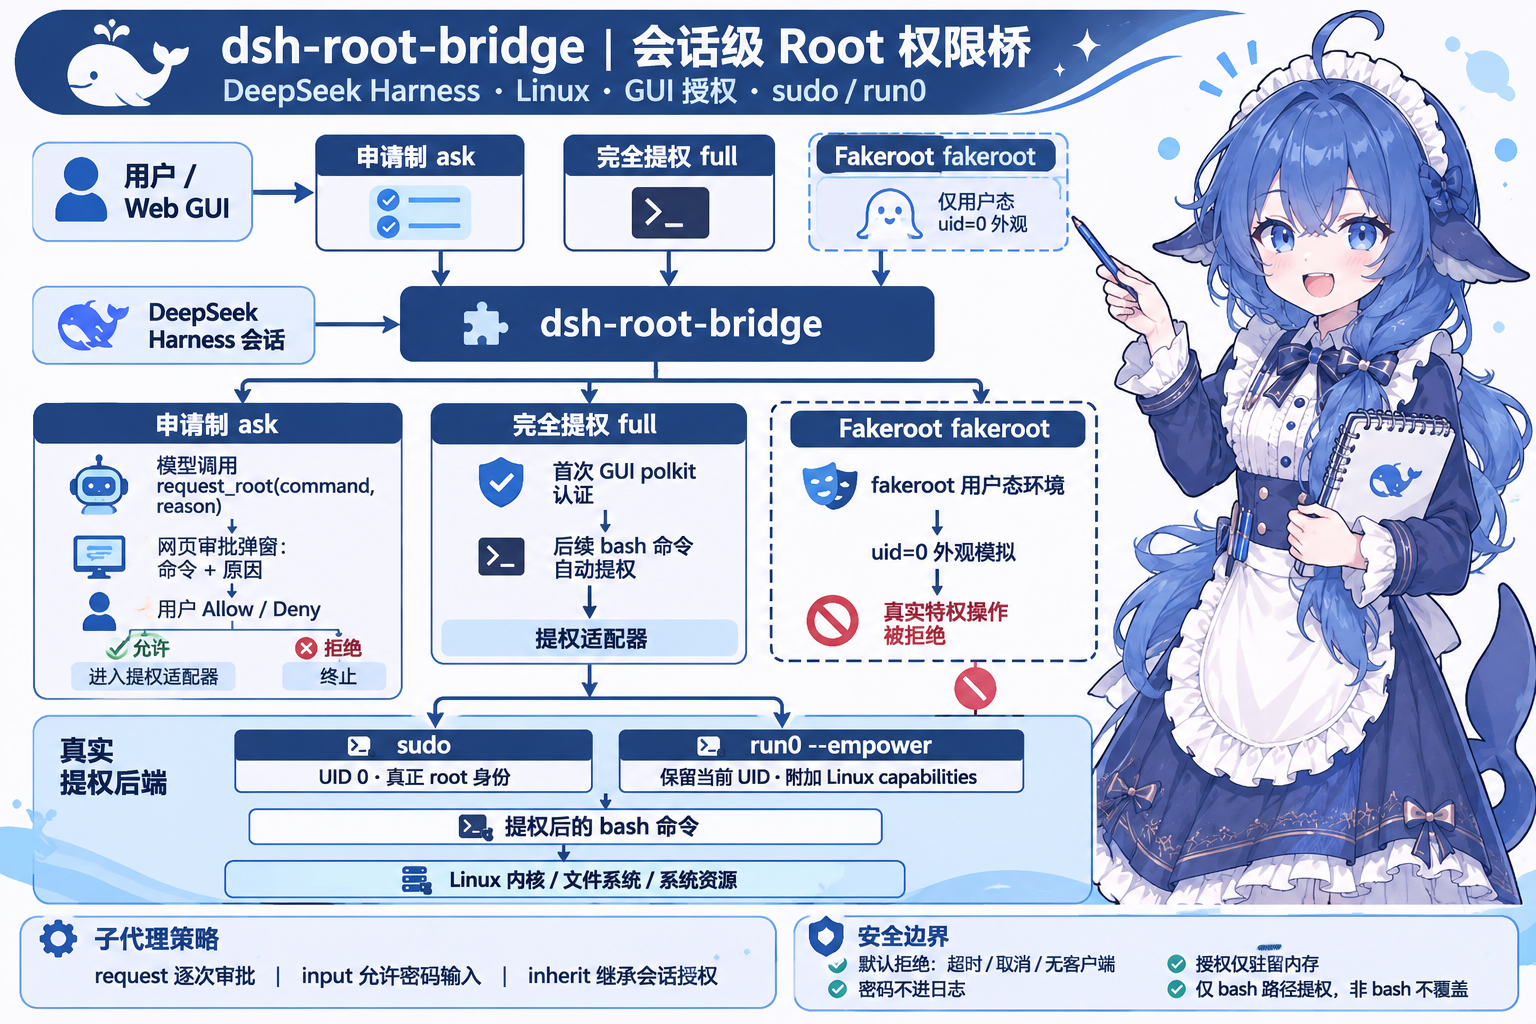
What is this / 这是什么
English — dsh-root-bridge gives every DeepSeek Harness session a configurable root-permission policy:
- Ask mode — the model requests root through a
request_roottool call; a web popup shows the exact command and reason for you to approve or deny, one request at a time. - Full root mode — the whole session runs elevated: every
bashcommand is escalated automatically. The first escalation asks for your password in the GUI (polkit). - Fakeroot mode — no password; commands run under
fakerootand only appear to be root, with no real privileges.
Escalation itself is pluggable — sudo (real uid 0) or run0 --empower (full Linux capabilities, keeps your uid). Delegated subagents get their own policy: ask each time, prompt for a password, or silently inherit the session grant.
中文 — 为 DeepSeek Harness 的每个会话提供可配置的 root 权限策略:
- 申请 root 权限执行 — 模型通过
request_root工具申请;网页弹窗展示要执行的命令和申请原因,由你逐次批准或拒绝。 - 完全 root 模式 — 整个会话以提权方式运行:
bash工具的所有命令自动提权。首次提权时在 GUI 弹窗输入密码(polkit)。 - Fakeroot 模式 — 无需密码,命令在
fakeroot中运行,仅伪装 root 身份,没有真实特权。
提权方式可切换 —— sudo(真实 uid 0)或 run0 --empower(附加全部 Linux capabilities,保持你的 uid)。委托子代理另有独立策略:逐次审批 / 触发密码输入 / 静默继承会话授权。
Permission modes / 权限模式
| Mode / 模式 | What it does / 行为 | Password / 密码 |
|---|---|---|
ask 申请制 | Every root action goes through a web approval popup showing the command and reason. / 每次 root 操作都经过网页审批弹窗(命令 + 原因)。 | First grant only / 仅首次授权 |
full 完全 root | All bash commands are elevated automatically. / bash 命令全部自动提权。 | First grant only / 仅首次授权 |
fakeroot Fakeroot | Commands run under fakeroot — id shows uid=0, files appear owned by root, but real privileged operations are refused. / 命令在 fakeroot 中运行,id 显示 0、文件看似 root 属主,但真实特权操作全部被拒。 | Never / 不需要 |
Escalation methods / 提权方式
sudo | run0 --empower | |
|---|---|---|
| Process uid / 进程 uid | 0 (root) | 1000 (your uid) |
| Privilege source / 特权来源 | Full root identity / 完整 root 身份 | All Linux capabilities (CapEff=000001ffffffffff) |
Read /etc/shadow, write /root / 读写敏感路径 | ✅ | ✅ (via CAP_DAC_OVERRIDE) |
| Password prompt / 是否要密码 | Yes; watch out for pam_faillock lockout / 是,且有 pam_faillock 锁号风险 | Not on this machine (empower group grants it via polkit) / 本机不需要(empower 组经 polkit 放行) |
| Files created by bash / 新建文件属主 | root | yourself / 你自己 |
run0 --empowerruns the command as you while attaching all capabilities — it is systemd's own “empower” semantics, not a uid switch. Both methods deliver real privileges; verified results are in Verified behavior.
Features / 功能特性
- Web approval popup / 网页审批弹窗 — shows the tool name, exact command, reason, escalation method and security warnings; Allow / Deny, Escape to cancel. / 展示工具名、完整命令、原因、提权方式与安全警告,可允许 / 拒绝,Esc 取消。
- Password (polkit) popup / 密码(polkit)弹窗 — password entry with “show password” toggle; browser autofill is disabled so a stale saved password cannot silently fail authentication. / 带「显示密码」开关的密码输入框,并禁用浏览器自动填充,避免旧密码被静默填入。
- Subagent policies / 子代理策略 —
request(approve each request),input(allow password entry),inherit(reuse the session grant). / 逐次审批、允许输入密码、继承会话授权三种。 - Language switcher / 界面语言切换 —
auto(follows the DSH locale live),zh, oren, applied to every piece of plugin UI. /auto实时跟随 DSH 语言,或强制中文 / English,作用于插件全部界面文案。 request_roottool /request_root工具 —command,reason,workdir,timeout_ms; the reason is mandatory by default (requireReason). / 参数含命令、原因、工作目录、超时;默认强制要求原因(可关)。- Fail closed / 默认拒绝 — no live web client, user cancel, or timeout (default 15 min,
promptTimeoutMs) all deny the request. / 无网页客户端、取消、超时(默认 15 分钟)一律拒绝。 - Secrets never leak / 密码不落日志 — sudo passwords travel through a
0600temp file +SUDO_ASKPASShelper, never on argv or in the session log; grants live in memory only and are wiped on plugin unload. / sudo 密码走 0600 临时文件 +SUDO_ASKPASS,不进命令行与会话日志;授权只存内存,插件卸载即清。 - Anti-lockout guard / 防锁号保护 — before attempting sudo verification the plugin checks
pam_faillockand refuses to try when failures already exist (3 wrong attempts lock the account for 10 minutes on this machine). / sudo 校验前先查pam_faillock,已有失败记录就拒绝再试,避免把账号锁死。 - Live switching / 实时切换 — every option is a
.volatile()config field: mode, escalation, policy and language change instantly, no restart. / 全部字段都是 volatile:模式、提权方式、策略、语言即时生效,无需重启。
Installation / 安装
Requirements / 环境要求:Linux, DeepSeek Harness 0.2.2-rc.1 (or later), and either sudo or run0 (systemd ≥ 258 for run0 --empower). / Linux、DeepSeek Harness 0.2.2-rc.1 及以上,并且具备 sudo 或 run0(run0 --empower 需要 systemd ≥ 258)。
From npm (recommended) / 从 npm 安装(推荐)
English — the plugin is published as @xiaohuangbo/dsh-root-bridge. Add it to the current profile with the plugin manager CLI:
dsh plugin add @xiaohuangbo/dsh-root-bridge
Pin an exact version when you need reproducibility / 需要固定版本时:
dsh plugin add @xiaohuangbo/dsh-root-bridge@1.0.0
Prebuilt npm installs skip the build-approval step, so this is the smoothest path. / npm 预构建安装无需构建授权,是最省事的路径。
中文 — 插件已发布为 @xiaohuangbo/dsh-root-bridge,用插件管理器把它装进当前 profile:
dsh plugin add @xiaohuangbo/dsh-root-bridge
From GitHub Packages (optional) / 从 GitHub Packages 安装(可选)
English — the same version is also published to GitHub Packages. GitHub Packages requires authentication even for public packages, so add a token with read:packages first:
# once: point this scope at GitHub Packages and store a token
npm config set @xiaohuangbo:registry https://npm.pkg.github.com
npm config set //npm.pkg.github.com/:_authToken=${GITHUB_TOKEN}

dsh plugin add @xiaohuangbo/dsh-root-bridge
Because of that auth requirement, npm remains the recommended path for most users. / 由于需要先配置 token,普通用户建议优先走 npm。
中文 — 同一个版本也会发布到 GitHub Packages。GitHub Packages 即便是公开包也要求认证,所以要先配置一个具备 read:packages 权限的 token:
npm config set @xiaohuangbo:registry https://npm.pkg.github.com
npm config set //npm.pkg.github.com/:_authToken=${GITHUB_TOKEN}

dsh plugin add @xiaohuangbo/dsh-root-bridge
Other ways / 其他安装方式
| Way / 方式 | Command / 操作 |
|---|---|
| From GitHub / 从 GitHub | dsh plugin add https://github.com/xiaohuangbo/dsh-root-bridge |
| Local bundle directory / 本地目录 | GUI 插件管理 → 「本地目录 / bundle 安装」→ 指向本仓库(自带 dsh.bundle 与 cordis.patch.yml) |
| Manual row / 手动加行 | 在 profile 的 cordis.patch.yml 中插入下方配置块 / insert the block below into the profile cordis.patch.yml |
- insert:
    - id: dsh-root-bridge
      name: '@xiaohuangbo/dsh-root-bridge'
      config: {}
After installation, reload the web page once and the plugin's settings section (Settings → Root bridge) plus the composer-dock Root ▾ chip appear. / 安装后刷新一次网页,即可在设置面板看到「Root 权限」页、在输入框底栏看到 Root ▾ 芯片。
Usage / 使用
English — three places control the plugin:
- Settings → Root bridge — full form: language, permission mode, escalation, require-reason, subagent policy, popup timeout, live grant count, and the security warnings.
- Composer bottom bar — a collapsed
Root ▾chip next to the permission chip: click to open the three-mode menu, click an option to switch instantly. - Config file — in the profile
cordis.patch.yml, add aconfigblock to thedsh-root-bridgerow (see Configuration).
The model side is one tool:
request_root— asks to run one bash command as root. In ask mode it opens the approval popup; in full mode it answers “bash is already elevated”; in fakeroot mode it explains that no real privilege exists.
中文 — 三个入口控制插件:
- 设置 → Root 权限 — 完整表单:界面语言、权限模式、提权方式、强制原因、子代理策略、弹窗超时、当前授权会话数与安全警告。
- 输入框底栏 — 权限芯片旁的折叠
Root ▾芯片:点开是三选一菜单,点击即切换、立即生效。 - 配置文件 — 在 profile 的
cordis.patch.yml中给dsh-root-bridge行加config(见配置)。
模型侧只有一个工具:
request_root— 申请以 root 执行一条 bash 命令。申请制下弹审批窗;完全 root 下提示“bash 已自动提权”;fakeroot 下说明没有真实特权。
Configuration / 配置
All fields are volatile — changes apply immediately. / 全部字段为 volatile,改动即时生效。
| Field / 字段 | Values / 取值 | Default / 默认值 | Meaning / 含义 |
|---|---|---|---|
mode | ask | full | fakeroot | ask | Permission mode / 权限管理模式 |
escalation | sudo | run0 | sudo | Escalation method / 提权方式 |
requireReason | true | false | true | Require a reason on every root request / 申请时强制要求原因 |
subagentPolicy | request | input | inherit | request | Subagent sudo policy / 子代理策略 |
promptTimeoutMs | number / 数字 | 900000 | Approval / password popup timeout in ms / 弹窗超时(毫秒) |
language | auto | zh | en | auto | Plugin UI language / 插件界面语言 |
# profile cordis.patch.yml
- id: dsh-root-bridge
  name: '@xiaohuangbo/dsh-root-bridge'
  config:
    mode: ask
    escalation: run0
    subagentPolicy: request
    language: auto
Verified behavior / 实测结果
Tested on Arch-based Linux, systemd 262, DSH 0.2.2-rc.1. / 实测环境:Arch 系 Linux、systemd 262、DSH 0.2.2-rc.1。
| Mode / 模式 | Escalation / 提权方式 | Popups / 弹窗 | Result / 结果 |
|---|---|---|---|
| ask / 申请制 | sudo | approval + password / 审批 + 密码 | ✅ uid=0, real root / 真 root |
| ask / 申请制 | run0 | approval only / 仅审批 | ✅ full capabilities, real privilege / 全 capabilities 真特权 |
| full / 完全 root | sudo | first-time password / 仅首次密码 | ✅ every bash auto-elevated to uid 0 |
| full / 完全 root | run0 | none / 无 | ✅ every bash auto-elevated (uid 1000 + full caps, parent = systemd) |
| fakeroot | — | none / 无 | ✅ cosmetic only — real privileged operations all refused / 仅伪装,真实操作全拒 |
Subagent policy request verified: a delegated subagent triggers its own approval popup and does not reuse the main session's existing grant. / 已实测 request 策略:子代理独立弹审批窗,不复用主会话已有授权。
Security / 安全说明
- Respect other people's privacy. / 尊重他人的隐私。
- Think twice before entering a command. / 输入命令前请三思。
- With great power comes great responsibility. / 能力越大,责任越大。
- Session grants live in memory only — a Harness restart requires re-authentication. / 会话级授权只存内存,Harness 重启后需重新验证。
- Passwords are never written to the session log or configuration. / 密码不写入会话日志与配置。
Development / 开发
npm test
Six tests, all passing / 6 个测试全部通过:
test/config-getters.test.mjs— config getters must readthis.config(plain values, volatile{ get() }wrappers, empty config); regression against the self-recursive getter that once crashed boot with “Maximum call stack size exceeded”. / 配置 getter 必须读this.config(普通值 / volatile 包装 / 空配置),防自递归 getter 回归。test/ask-flow.test.mjs—askUser → status().pending → decide/submitPassword → settlefor approval, password and deny paths. / 审批、密码、拒绝三条链路的闭环测试。test/client-contract.test.mjs— client contribution descriptors satisfy the real typert registry validators; the previously shipped broken descriptor shape must be rejected; a failing step must degrade only that step. / 客户端描述符必须通过真实校验;旧错误形状必须被拒绝;单步失败只降级该步。test/client-integration.test.mjs— activates the client half in a real Cordis context with the shipped@deepseek-ai/dsh-typert-registryand@deepseek-ai/dsh-api-gatewaybundles, verifying namespace mount and real RPC wiring. / 用真实 typert 注册表与网关 bundle 激活客户端半边,验证命名空间与真实 RPC。
Implementation notes (read before touching this code) / 实现要点(改代码前必读):
Expand / 展开
- No Host→Client forwarded events — the gateway's
registerRemoteEventsis single-source (if (this.remoteEvents !== undefined) throw) and@deepseek-ai/dsh-api-remotesowns it at boot. Approval therefore ridesstatus().pending+ a 600 ms client poll, answered via thedecide()/submitPassword()Remote methods. / 网关远程事件源是单源的,已被 api-remotes 占用;审批改为status().pending+ 客户端 600ms 轮询 + Remote 方法应答。 - Never combine
-nwith-Afor sudo —-nmeans “never prompt”, which also disablesSUDO_ASKPASS; any password-protected account then fails verification unconditionally. /-n连 askpass 都不调用,与-A互斥,密码校验必失败。 pam_faillocktrap — one sudo verification retries 3 times internally; a wrong password fills the deny threshold instantly and locks the account for 10 minutes (correct passwords then fail too). The plugin refuses to try when failures already exist; unlock withfaillock --reset. / sudo 一次校验内部重试 3 次,错密码立刻锁号 10 分钟;插件会在已有失败记录时拒绝再试,手动解锁用faillock --reset。- Tool
output.rendermust return content blocks —() => [{ type: 'text', text }]; a bare string crashes downstreamcontent.some. / render 必须返回内容块数组,裸字符串会让下游崩溃。 - Avoid
ctx.shell.execute— in this composition it requires asandboxPolicyon the request (only the bash tool has one). The plugin spawnsbash -cdirectly; elevated commands are isolated by sudo/run0 anyway. / 该服务要求 sandboxPolicy(仅 bash 工具持有),插件改为直接 spawn。 - Use
ctx.get('shell'), notctx.shell— direct property access throwscannot get property "shell" without inject. / 直接点属性会抛 cordis 注入错误,用ctx.get。 - Reset the modal's
busyon every new request — otherwise, after one answered request, the next popup's buttons renderdisabled(“clicking does nothing until refresh”). / busy 必须在每次新请求时重置,否则下一个弹窗按钮全是 disabled。 - Never use
this.ctx.fiber.entryto find the config row — it pointed at the typert-gateway entry here, silently writing mode changes into the gateway config. Resolve your own entry fromconfigEditor.entries()by id/module name instead. / 它会指向 typert-gateway 条目,把模式写进网关配置;必须按 id/模块名从configEditor.entries()里找自己的行。 - Host hot-reload requires a new file name — Node's ESM cache and the cached
package.jsonare keyed by path; after editing, deploy under a new file name (currentlysvc14.js), or restartdsh web. Note the side effect: renaming invalidates the saved profile override row, so the plugin config resets once after a rename. / ESM 缓存按路径生效,改宿主代码要换新文件名(当前svc14.js);注意换名会使已保存的配置覆盖行失配一次。 - run0 on systemd 262 — no
--waitflag; never probe with--no-ask-password(polkit refuses interactive auth outright — probe with plainrun0 --empower true);scriptneeds-eto forward the child exit code;--empowermeans “capabilities for the current user”, not a uid switch. / systemd 262 无--wait;探测别用--no-ask-password;script要-e;--empower语义是给能力而非切 uid。
Dependencies / 依赖
English — DeepSeek Harness ships the packages this plugin imports, so they are declared as peerDependencies, never bundled copies. That keeps a single instance of schemastery and dsh-typert-protocol in memory and avoids version drift between the plugin and the harness:
"peerDependencies": {
  "@deepseek-ai/schemastery": "^3.19.0",
  "@deepseek-ai/dsh-typert-protocol": ">=0.2.2-rc.1 <0.3.0-0"
}
They are mirrored into devDependencies so npm test works in a fresh clone.
中文 — 本插件 import 的这些包由 DeepSeek Harness 自身提供,因此声明为 peerDependencies,不打包自己的副本。这样内存里只有一份 schemastery / dsh-typert-protocol 实例,也不会出现插件与宿主版本漂移:
"peerDependencies": {
  "@deepseek-ai/schemastery": "^3.19.0",
  "@deepseek-ai/dsh-typert-protocol": ">=0.2.2-rc.1 <0.3.0-0"
}
同时镜像到 devDependencies,保证全新克隆后 npm test 能跑。
Publishing / 发布
English — two registries are configured. publishConfig defaults npm publish to GitHub Packages; the CLI flag overrides it for npm (npm ≥ 9 gives CLI flags priority over publishConfig):
| Command | Target |
|---|---|
npm run publish:npm | https://registry.npmjs.org |
npm run publish:gh | https://npm.pkg.github.com (from publishConfig.registry) |
npm run publish:both | both, one after the other |
Publishing to GitHub Packages needs a token with write:packages in ~/.npmrc; the repository field must match the repo, and the package scope must match the GitHub owner (both already true here).
# ~/.npmrc
//npm.pkg.github.com/:_authToken=${GITHUB_TOKEN}
中文 — 配置了两个注册表。publishConfig 让 npm publish 默认发到 GitHub Packages;发布 npm 时用 CLI 参数覆盖(npm ≥ 9 中 CLI 参数优先于 publishConfig):
| 命令 | 目标 |
|---|---|
npm run publish:npm | https://registry.npmjs.org |
npm run publish:gh | https://npm.pkg.github.com |
npm run publish:both | 依次发布到两个注册表 |
发布到 GitHub Packages 需要在 ~/.npmrc 里配置具备 write:packages 的 token;repository 字段必须指向本仓库,包作用域必须与 GitHub 账号一致(本仓库两者都满足)。
# ~/.npmrc
//npm.pkg.github.com/:_authToken=${GITHUB_TOKEN}
Known limitations / 已知限制
- If sudoers sets
Defaults requiretty, non-interactive sudo may be refused — use passwordless sudo orrun0. / sudoers 若配了Defaults requiretty,非交互 sudo 可能被拒,请改用免密 sudo 或 run0。 run0 --empowerkeeps your uid; files it creates are still owned by you. /run0 --empower保持你的 uid,创建的文件仍归你所有。- fakeroot is user-space fakery — kernel-level operations (mount, real chown, ping) stay restricted. / fakeroot 只是用户态伪装,需要内核权限的操作依旧受限。
- Linux only; non-
bashexecution paths (pwsh, terminal tools) are not escalated. / 仅 Linux;bash之外的执行路径(pwsh、终端工具)不在提权范围内。
License / 许可
GNU General Public License v3.0 🄯 2026 xiaohuangbo
This program is free software: you can redistribute it and/or modify it under the terms of the GNU General Public License as published by the Free Software Foundation, version 3 of the License. It is distributed in the hope that it will be useful, but without any warranty; without even the implied warranty of merchantability or fitness for a particular purpose. See the GNU General Public License for more details.
本程序为自由软件:你可以依据自由软件基金会发布的 GNU 通用公共许可证第三版的条款重新发布或修改它。本程序希望有用,但不提供任何担保,甚至不提供适销性或特定用途适用性的默示担保。详见 GNU 通用公共许可证。