dsh-workbuddy-theme
elegant01/dsh-workbuddy-theme
Recolours and re-lays-out the DSH Web GUI as Tencent WorkBuddy desktop does: mint brand #00c29a, gray sidebar, 24px composer with a single hairline border, 848px column. Values are read from WorkBuddy v5.0.2 asar tokens, not eyeballed; light mode only, pure CSS, restores by removal.
Installazione
dsh plugin --profile web add github:elegant01/dsh-workbuddy-themeREADME
dsh-workbuddy-theme
把 腾讯 WorkBuddy 桌面端的视觉(配色 / 字体排版 / 会话布局)搬到 DSH Web GUI 的主题插件。
只做浅色。不改 DOM、不拦事件、不发请求,移除 <style> 节点即完全还原。
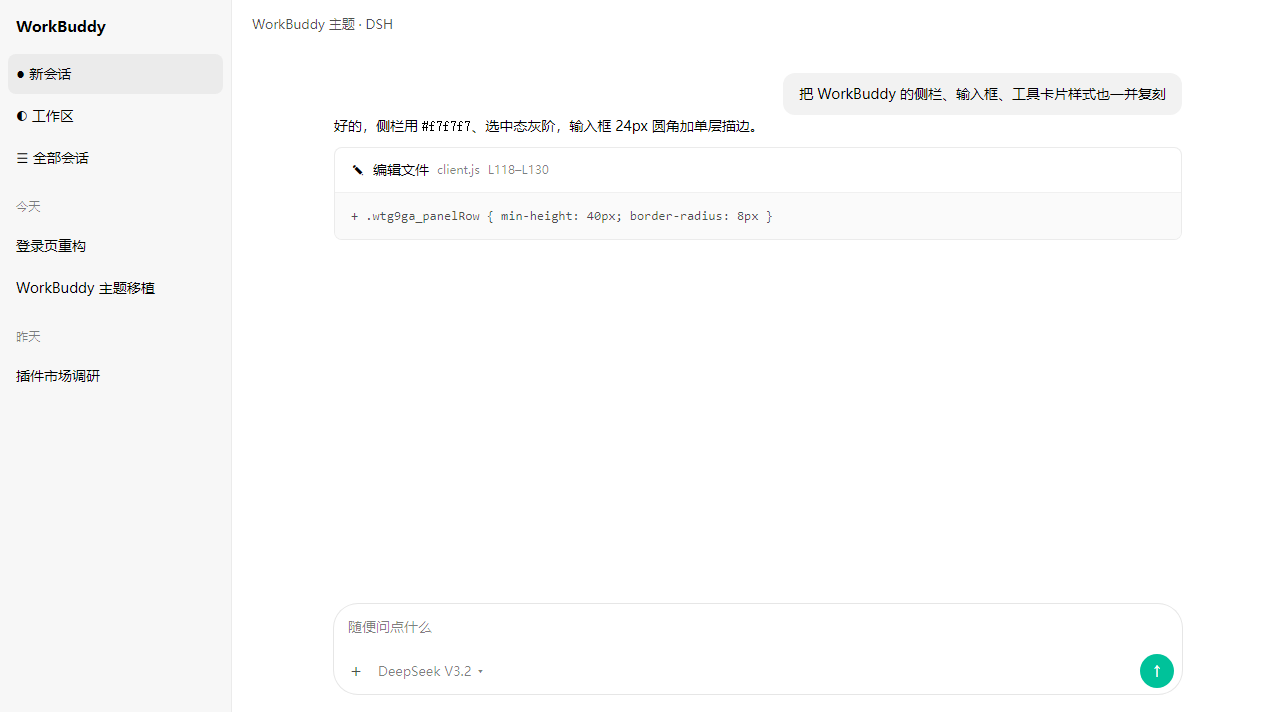
它复刻了什么
配色、字号、间距不是「看着像」,而是逐项从 WorkBuddy v5.0.2 安装包里量出来的:
- 设计令牌来自
resources/app.asar→/renderer/assets/src-Dml5RbhE.css(共 1985 个--wb-*变量) - 组件规格来自
.im-conversation-item、.wb-cb-chat.light、.assistant-message-tool等真实规则
| 维度 | WorkBuddy 取值 | 本插件落在 |
|---|---|---|
| 品牌色 | --wb-palette-brand-8 #00c29a(薄荷绿) | --dsw-static-deepseek-500 + --wb-brand 1/2/3/7/9/10 阶梯 |
| 灰阶 | gray-1 #fafafa → gray-5 #e6e6e6 | --wb-gray-1..5 与 --dsw-static-neutral-bluish-* |
| 正文色 | #000 / #000000b3 / #00000080 / #0000004d | --dsw-alias-label-primary/secondary/tertiary/dimmed |
| 描边 | color-mix(#000 8%, transparent) | --wb-border + --dsw-alias-border-l1..l4 |
| 字号刻度 | 12 / 13 / 14 / 16 / 18 | 正文 14px、代码 13px、小字 12px |
| 行高 | 正文 22px | --wb-lh-body: 22px |
| 对话栏宽度 | --cb-chat-max-content-width: 848px,屏宽 ≥1681px 时 1008px | --dsh-chat-content-width |
| 侧栏底色 | --wb-sidebar-bg = gray-2 #f7f7f7 | .wtg9ga_root |
| 侧栏条目 | 圆角 8px、最小高 40px、左右内边距 8px、14px/22px、选中用灰阶不用品牌色 | .wtg9ga_panelRow |
| 用户消息 | 圆角 12px + #f2f2f2 浅灰底 | ._bubble_* + --dsw-specific-bubble |
| 助手消息 | 无边框、无底色,只留白 | 未加任何容器样式 |
| 输入框 | 圆角 24px、单层 #e6e6e6 描边、聚焦不变色 | .GRgSLq_card |
| 工具卡片 | 圆角 8px、卡头 12px 16px、工具名 14px、路径 12px | .hKdVjq_* |
| 字体栈 | PingFang SC, system-ui, -apple-system, BlinkMacSystemFont, Segoe UI, sans-serif | 同值,追加 Microsoft YaHei UI 兜底 |
关于字体
WorkBuddy 没有打包自有中文 UI 字体(asar 里的 Assistant-*.woff2 只给 Excalidraw 用),
它「好看」的一半来自 PingFang SC 在 macOS 上的渲染。
Windows 上最接近 PingFang SC 的静默替代是系统自带的 微软雅黑 UI(Microsoft YaHei UI)——
它和 PingFang 同为「拉丁稍窄 + 中宫较松」的脸,实测 Em 宽 1.317em,可以直接顶替,不需要另装字体。
想更进一步,可配 dsh-fonttune 换成 HarmonyOS Sans SC 或 MiSans。
安装
# 从 npm(推荐)
dsh plugin --profile <你的 profile> add dsh-workbuddy-theme

# 从 GitHub
dsh plugin --profile <你的 profile> add github:elegant01/dsh-workbuddy-theme

# 从本地目录
dsh plugin --profile <你的 profile> add file:/path/to/dsh-workbuddy-theme
装完后重启应用(主题是客户端 CSS,刷新页面不一定会重新拉取插件清单)。
它做了什么
插件本质上只有一件事:往页面 <head> 注入一段 <style id="dsh-workbuddy-theme-css">。
index.js          宿主端,只有一个空 apply(),作用是让加载器把插件挂进插件集合
client.js         全部效果所在:一段 CSS(约 300 行,含注释)
cordis.patch.yml  dsh.bundle 清单,声明插件 id 与包名
CSS 分三层,从稳到脆:
- 改设计令牌(约占 70%)——覆盖
--dsw-alias-*/--dsw-static-*/--dsw-font-*,DSH 升级后基本不会坏 - 覆盖组件选择器(约占 30%)——优先用宿主发布的
data-*属性 ([data-composer-card]/[data-message-bubble]/[data-tool]), 只有没有属性的地方才退回带哈希的类名(.wtg9ga_*/.GRgSLq_*/.hKdVjq_*) - 不打 DOM 补丁——不重写结构、不注入元素
侧栏定制带探测门控:插件加载时找不到 .wtg9ga_*(DSH 升级改了类名)就整段跳过并在控制台告警,
不会把错位的样式硬套上去。配色与字体不受影响。
字体与正文排版也走令牌(--dsh-font-family-text-default / --dsw-font-markdown-base),
不是锁类名,所以标题、代码、表格的字体栈会一起跟着变。
更新日志
见 CHANGELOG.md。
发版流程
打 v* tag 即触发 GitHub Actions(.github/workflows/publish.yml):校验 tag 与 package.json 版本一致、
校验插件清单(dsh.bundle.patch / main / index.js 具名导出)、npm pack 冒烟测试,最后建 Release。
# 1. 改版本号
npm version 0.2.1 --no-git-tag-version
# 2. 发布到 npm(需要 OTP,见下)
npm publish --registry=https://registry.npmjs.org/ --otp=<6位验证码>
# 3. 提交并打 tag,触发 CI
git commit -am "release: 0.2.1" && git tag -a v0.2.1 -m "0.2.1" && git push origin main --follow-tags
为什么 CI 不自动发布:npm 账号开启两步验证(auth-and-writes / auth-only)之后,
任何 token 发布都会要求 OTP——Automation token 也不例外(2026-11 实测:用 Automation token 发布
返回 EOTP,携带任意 OTP 返回同样的 EOTP)。OTP 只存在于你的验证器里,CI 拿不到。
所以发布这一步只能在本机交互完成,CI 负责其余全部校验。
已知取舍
- DSH 前端类名是 CSS Modules 生成哈希(如
.wtg9ga_panelRow)。插件里的选择器直接写了这些类名, 这样最精确、不会误伤;代价是 DSH 大版本升级后如果前缀变了,需要重新对一遍。 文件里每段都标注了来源(InputBar_module_css_default、SidebarRoot_module_css_default等),改起来有据可循。 - DSH 若把
--dsw-*令牌改名,令牌覆盖会失效 —— 页面只是回到原主题,不会坏。 - 只做浅色。深色模式未实现(作者自己用不上)。
- 只针对 DSH Web GUI;DSH TUI / headless 不受影响。
许可
MIT。WorkBuddy 是腾讯的产品,本项目与其无关联,只是照着它的公开界面做视觉复刻,不含其任何代码或资源。
Plugin correlati
dsh-wallpaper-engine
elysia395/dsh-wallpaper-engine
dsh-deep-whale (maid-atelier)
small-tailqwq/dsh-deep-whale
dsh-deep-whale
small-tailqwq/dsh-deep-whale
dsh-claude-style
nwflower/dsh-claude-style